Sculpting Tools


Sculpting Tools
These tools allows us to modify the mesh surface, the geometry and the brushes of the object that we are sculpting.
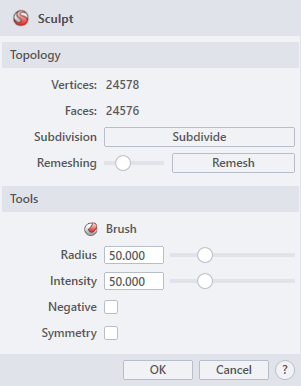
Topology:
› Vertices
It allows us to check the recount of vertex of the model.
› Faces
It allows us to check the recount of faces of the model.
› Subdivision
It allows us to increase the level of subdivision of the geometry by one. We can use it multiple times to increase it drastically.
› Remeshing
It allows us to modify the topology of the model trying to keep the mesh shape and reducing the mesh density.
Tools:
› Brush Information
It allows us check the brush we are currently using.
› Radius
It allows us to increase or decrease the brush size (effective command range).
› Intensity
It allows us to increase or decrease the effectiveness of the brush (effective command strength).
› Negative
When activated, it flips the direction of commands.
› Symmetry
When activated, it allow us to modify geometry symmetrically in both sides.
Brushes Information
Tool |
Icon |
Command |
|
_ClaySculptBrush |
|
|
_ClaySculptCrease |
|
|
_ClaySculptFlatten |
|
|
_ClaySculptInflate |
|
|
_ClaySculptPinch |
|
|
_ClaySculptSmooth |
|
|
_ClaySculptTwist |
|
|
_ClaySculptDrag |
1. Click  button to validate the command and apply the new geometry on the scene.
2. Click  button to cancel the command, and refuse to apply geometry on the scene.
3. Click  button to open the help information of the command, in case you need more detailed information about the tool being used.


